
Hard floors, bare walls, and a laptop mic turn a spare bedroom into an echo chamber. Acoustic panels do not soundproof your room from neighbors — they absorb mid- and high-frequency reflections so your voice sounds clearer on calls and the room feels less “ringy.” If your goal is blocking outside noise, you need mass, seals, and different products; panels alone will not stop lawnmowers.
This guide is criteria-first for US home offices. Prices are approximate ranges as of October 2026, not quotes for specific brands.
Quick answer
| Your problem | Better first step |
|---|---|
| Colleagues hear echo / “bathroom” reverb on Zoom | Soft panels (or thick curtains + rug) at first reflection points and behind you on camera |
| Neighbor TV or street noise | Weatherstripping, solid-core door seals, heavy curtains; panels alone will disappoint |
| Keyboard clicks and chair squeaks | Quieter peripherals and chair maintenance first; panels help only a little |
| Small budget under about $100 | One large rug, thick curtains, and 2–4 DIY or budget foam/fabric panels behind the desk |
| Serious voice recording | Mix of thicker broadband panels + bass traps in corners; treat more surface area |
What panels do — and do not do
Absorption vs soundproofing
- Absorption reduces reflections inside the room. Fabric-wrapped mineral wool or fiberglass panels, acoustic foam, and thick textiles fall here.
- Soundproofing / isolation keeps sound from leaving or entering. That needs mass (drywall layers), air gaps, sealed doors, and sometimes specialized windows. Selling “soundproof foam” on panels is mostly marketing.
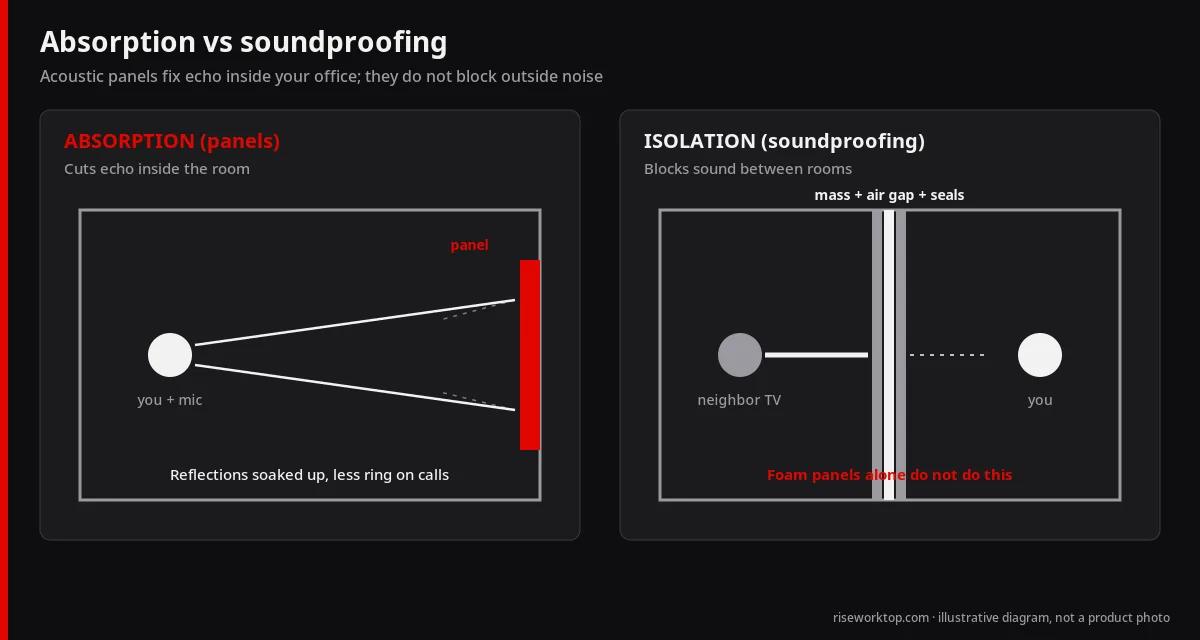
For remote work, clearer speech and less slap echo matter more than studio-grade isolation. Pair clearer audio with a decent webcam path from our webcam vs laptop camera guide and flattering light from the desk lamp for video calls guide.
Frequency ranges that matter on calls
Human speech sits roughly in the midrange. Thin foam that looks impressive on a wall often does little below about 500 Hz. Look for NRC (Noise Reduction Coefficient) on product sheets: an NRC around 0.7–0.95 on a 2-inch fabric panel is typical of useful office absorbers. Foam tiles with no published NRC are a gamble.
Panel types for a home office
Fabric-wrapped mineral wool or fiberglass
- Usually 1–2 inches thick, wood or metal frame, fabric face
- Strong mid/high absorption; 2-inch panels outperform 1-inch for broader control
- Safer when wrapped properly; do not leave raw fiberglass exposed near kids or pets
- Common size: 24×48 inches
Acoustic foam (wedges / pyramids)
- Cheap and light
- Helps a bit with flutter echo when coverage is large
- Often weaker at lower mids; check thickness (2+ inches better than 1 inch) and published data
- Looks “studio”; some households prefer fabric panels for a finished look
Soft furnishings that act like panels
- Thick curtains over windows behind or beside you
- Area rug on hard floors
- Upholstered sofa or bookshelf filled with books on a live wall
- These often give the biggest change per dollar before you buy branded panels
Bass traps and “broadband” corner panels
Worth it mainly if you record voice or music and hear boominess. For typical spreadsheet-and-Slack days, start with wall panels at reflection points instead.
Placement that actually helps calls
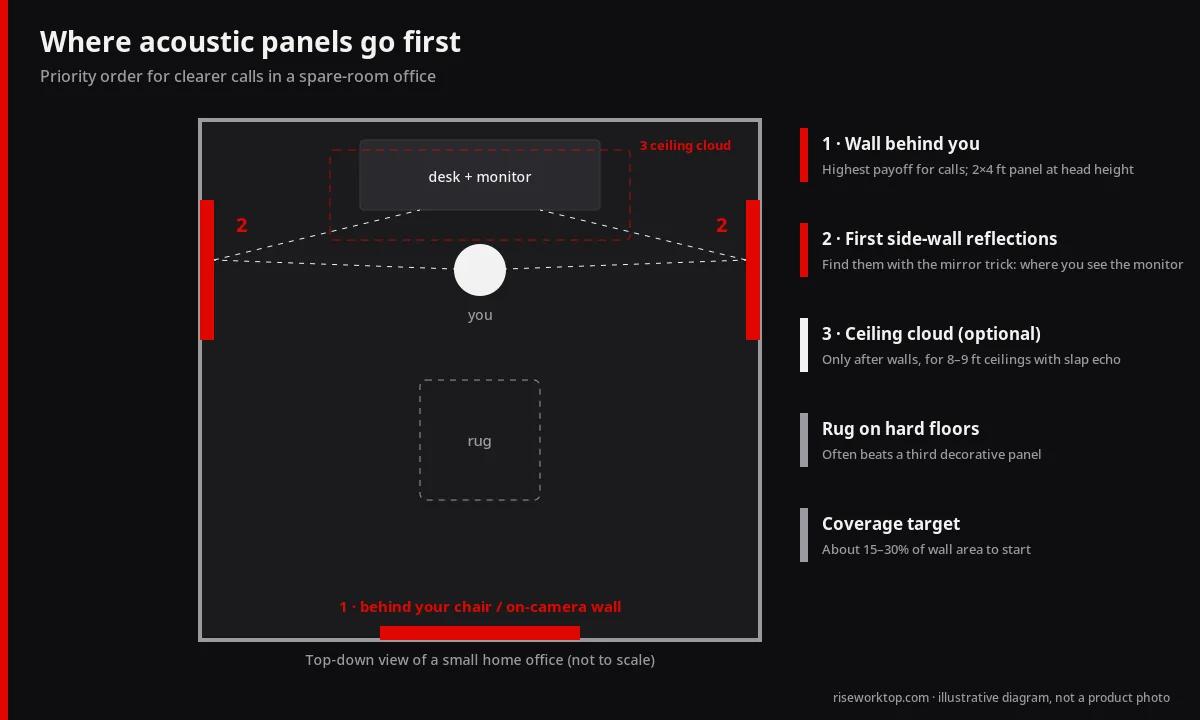
1. Behind your chair / on-camera wall
Reflections bouncing off the wall behind you muddy the mic. A 2×4-foot panel (or two) centered behind your head height is a high-ROI first buy.
2. First reflection points on side walls
Sit at the desk, have a helper slide a mirror along the side wall; where you see the monitor or your face in the mirror is a first-reflection zone. Put absorbers there.
3. Ceiling cloud (optional)
In rooms with 8–9 ft ceilings and a loud slap, one or two panels suspended or mounted above the desk help. Harder DIY; skip until walls are treated.
4. Do not cover every wall
A dead room feels uncomfortable. Aim for roughly 15–30% of wall surface in a small office starting out, then add if needed. Leave some reflective surfaces.
Coverage and sizing rules of thumb
- Start with 2–4 panels of about 24×48 inches in a spare bedroom
- Prioritize the wall behind you and the nearest side wall
- For open-plan living rooms, combine a rug + curtains + a portable panel behind the laptop rather than covering living-room décor
- Leave HVAC vents and smoke detectors clear
DIY vs ready-made
| Approach | Approx. DIY cost mindset | Notes |
|---|---|---|
| Ready-made fabric panels | About $40–$120 each for decent 24×48 | Faster, cleaner look, published NRC on better SKUs |
| DIY mineral wool + fabric + frame | Often lower per panel if tools exist | Wear a mask; seal edges; check fire codes and landlord rules |
| Foam packs | About $20–$80 for multi-packs | Fine for experiments; verify thickness and coverage area |
If you rent, use removable adhesive mounts or picture-rail hanging instead of heavy drywall anchors when possible. Confirm weight ratings.
Approximate budgets (US, October 2026)
| Goal | Approx. range | What you usually get |
|---|---|---|
| Soft furnishings only | About $50–$200 | Rug + curtains; often biggest first improvement |
| Starter panel kit (2–4 panels) | About $80–$300 | Behind desk + one side wall |
| Finished look, 6–8 panels | About $300–$800 | More even absorption, nicer fabric colors |
| Voice-focused room | About $500–$1,500+ | Thicker panels, corners, careful placement |
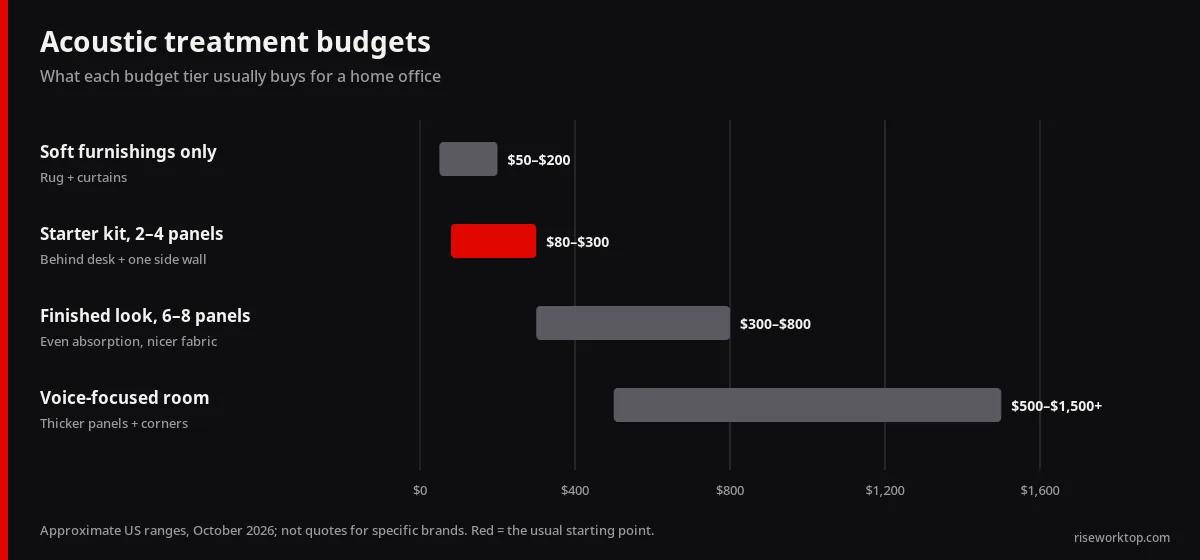
Prices vary widely by brand and fabric. Use ranges to plan, then compare NRC, thickness, and mounting hardware.
Checklist before you buy
- Confirm the problem is echo (reverb) vs outside noise (isolation)
- Measure wall space behind the chair and first side-wall reflection
- Prefer published NRC and 2-inch thickness for primary panels
- Plan mounting that your landlord / HOA allows
- Add a rug and curtains if floors and windows are bare
- Test with a phone voice memo before and after the first two panels
Common mistakes
- Expecting foam tiles to block neighbor noise
- Covering every wall until the room feels lifeless
- Mounting tiny thin foam only around a monitor and calling it done
- Ignoring the hard floor (a rug often beats a third decorative panel)
- Putting panels only where they look cool on Instagram, not at reflection points
FAQ
Will acoustic panels make my apartment soundproof?
No. They reduce reflections inside the room. Blocking transmission needs seals, mass, and construction changes.
How many panels do I need for Zoom?
Many people notice clearer audio after two large panels behind and beside the desk, plus a rug. Add more only if clap tests still ring.
Is foam good enough?
Thick foam can help flutter echo. For speech clarity, fabric-wrapped mineral-wool or fiberglass panels with published NRC are usually more predictable.
Where should panels go relative to my webcam?
Behind and slightly beside you helps both audio and the visual background. Avoid shiny plastic foam right in the camera frame if you care about looks.
Do I still need a good microphone?
Yes. Panels help the room; a headset or decent USB mic still helps capture. Fix both when calls matter.
Clap test and phone memo method
Stand in the middle of the room and clap once. A sharp flutter or long ring suggests reflective surfaces to treat. After installing the first panels, record a 20-second phone voice memo at your desk position before and after. Listen on headphones for less “room” around your voice. This cheap loop beats guessing from product photos.
Bottom line
Treat echo, not fantasies of soundproofing. Start with rugs and curtains, add 2–4 thick absorptive panels at the wall behind you and the first side reflection, check NRC and thickness, and stop when clap tests and call feedback sound natural — not dead.